 |
|
|
|
|
|
|
|
|
|
|
|
|
|
|
|
|
|
|
|
|
|
|
|
|
|
|
|
|
|
|
|
|
|
 |
|
|
|
|
|
|
|
|
|
|
|
|
|
|
|
|
|
|
|
|
|
|
|
|
|
|
|
 |
|
 |
|
|
|
 |
|
Effective, Real world, Race & Street Proven Parts & Accessories
|
|
|
|
|
|
|
|
|
|
|
|
|
|
|
|
|
|
|
|
 |
|
|
|
|
|
|
|
|
|
|
|
|
|
|
|
 |
|
|
|
|
|
|
|
|
|
|
|
 |
|
|
|
|
|
|
|
|
|
|
|
|
|
|
|
|
Before you order your Cobra Valley R/T Suspension package, if you do not know your current spring rate and would like to compare what you have to what you may want to order, use the measurement guide below to submit your exact specs and Cobra Valley will evaluate and calculate these for you!
|
|
|
|
|
|
|
|
|
 |
 |
|
|
|
|
 |
|
|
|
|
|
|
|
|
|
COUNT THE NUMBER OF ACTIVE COILS: First ensure the coil spring is unloaded and completely extended. The spring should be loose and wiggle or be able to be easily rotated on the shock by hand. This is best done with the height adjuster completely relaxed or removed from the coil entirely. Count only the coils that are not touching another or the end of the shock absorber. The top and bottom coils touching the spring seats re not counted.
Count the active coils in a perfect vertical line from top to bottom. If you rotate the shock a coil at the top will become nearer to touching while the coil at the bottom will become further from touching. To the left is the same shock rotated 180 degrees to illustrate this result. Be very accurate in this count, one coil off could result in as much as a 100 pound error.
|
|
|
|
|
|
|
|
|
|
 |
|
|
|
|
 |
|
|
|
|
|
|
|
|
|
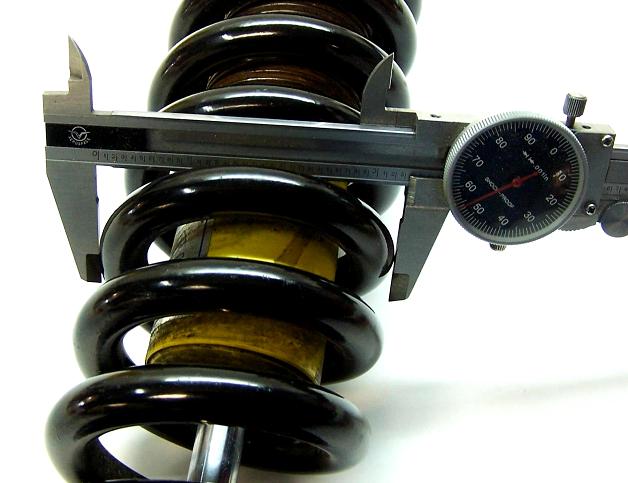
MEASURE THE OUTER SPRING DIAMETER: Measure the outer diameter of the coil spring using a dial caliper. Be sure to keep the caliper perfectly 90 degrees to the coil so you are measuring directly across the coil, not at an up or downward angle. Be very accurate in this measurement, just 1/16" error (.062") could result in as much as a 30 pound error.
|
|
|
|
|
|
|
|
 |
 |
|
|
|
|
 |
|
|
|
|
|
|
|
|
|
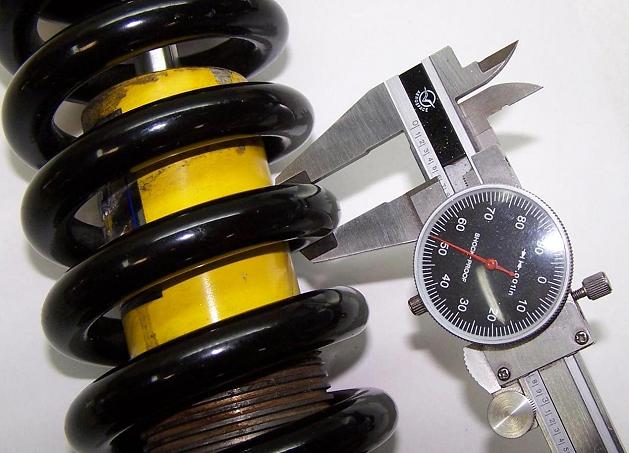
MEASURE THE WIRE DIAMETER: Measure the outer diameter of the WIRE of the coil spring using a dial caliper. Be sure to keep the caliper perfectly in line with the coil so you are measuring directly across the coil wire, not at a side angle. Be very accurate in this measurement, just 1/16" error (.062") could result in as much as a 300 pound error.
|
|
|
|
|
|
|
|
 |
|
|
|
|
|
|
Coil Spring Rate Calculator
|
|
|
|
|
|
|
 |
|
|
|
|
|
|
|
|
|
|
|
ENTER YOUR MEASUREMENTS: Determine your approximate coil spring rate. The more accurate your measurements are, the more accurate your result will be.
|
|
|
|
|
|
|
|
|
|
|
|
|
|
|
|
|
|
 |
|
|
|
|
|
|
|
|
|
Before you order your Cobra Valley R/T Suspension package, it is always a good idea to measure your shock ride height. This would be the distance from the center of the top shock hole to the bottom shock hole, with the weight of the car on the tires in it's "ready to drive" position. This must be done with the hock installed on the car and it tells us the perfect length ot make the shock so it is in the middle of it's stroke with even piston travel up or down when installed.
|
|
|
|
|
|
|
 |
 |
|
|
|
|
 |
|
|
|
|
|
|
|
|
|
PREPARE THE CAR: Before you can measure the actual shock ride height of your car, you must make sure the car's tire to fender ride height is set to your desired stance. Once that is set, you need to roll the car forward a few feet before measuring. This is especially critical after lowering the car from the air, which would otherwise result in a taller than actual ride height masurement.
HOW TO MEASURE: If you have a 4 post drive on lift, that is ideal to measure on. If you do not, using a flash light you can reach up under the rear to measure, and then in the front turn the steering wheel to one side to make it easier to measure. While you should not have to measure all 4 corners, it is not uncommon for them to be different from each other. Sometimes notably different.
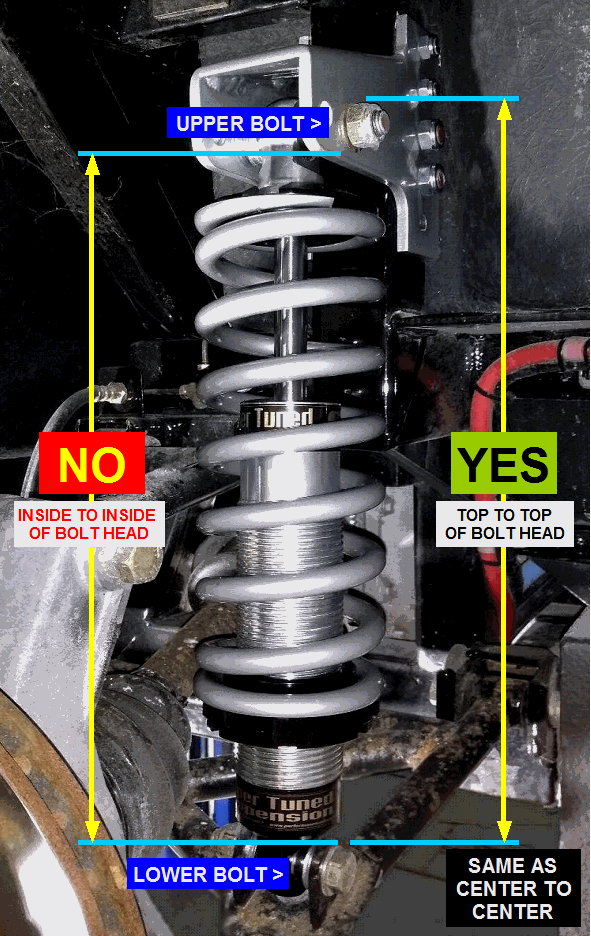
MEASURE THE SHOCK RIDE HEIGHT: With a tape measure, hang the tape end over the top edge of the upper shock bolt head to the top edge of the lower shock bolt head and take the measurement. You can also measure from the bottom of the upper shock bolt head to the bottom of the lower shock bolt head. This is the same as measuring center to center of the bolts holes but easier and more accurate. If the upper and lower bolt heads are different diameters, please note this so the final number can be compensated. NEVER measure from both inside edges of the bolt heads, or from both outside edges. IF you do this the final number will be either shorter or longer than the actual center to center measurement by about 1 full inch.
ALTERNATE METHOD: You cannot measure the shocks off of the vehicle, which would merely be duplicating what was on the car, even if not correct, and doesn't tell us what is best for that particular car. If you have no shocks at all, simply place jacks under the front and rear of the frame and level the jacks until you achieve the desired visual tire to fender ride height, then measure from center hole to center hole where the shock will mount.
|
|
|
|
|
|
|
|
|
